


How to Build a ROM for Nintendo Consoles on macOS
Get started in homebrew development. Learn how to build a ROM and test it on an emulator on macOS. Create your own games and apps for consoles.
Coding for Video Game Consoles
Through the wonderful world of homebrew, you can develop your own games, applications and run custom code on your favorite consoles or emulators. The Nintendo homebrew scene blew up in the early 2000s with the Game Boy Advance (GBA) and Nintendo DS as people found ways to execute custom software on these devices using independently built and open-source development tools. This meant you didn’t have to be part of an established game studio to make games, anyone who knew how to code, or wanted to learn how to code could do it themselves. Today, these tools have continued to mature and expand to modern consoles like the Nintendo Switch. Nintendo has made it slightly easier to get your hands on their official development kit but if you go that route you’ll still have to go through an application process, convince them that you’ve got something good, and sign an NDA which will prohibit you from openly discussing their development tools. This is well within their right, and a necessary process if you are planning on selling your creation as an officially licensed Nintendo product. But what if you just want to start building games or software without a particular title in mind, or you want to build for older systems that are no longer in production?Fortunately you can with freely available homebrew tools. Homebrew can be a great way to learn game development and familiarize yourself with console hardware. In this tutorial, we’ll be setting up a homebrew development environment on macOS. Windows users can do the same here, and Linux users can here. Once you’re set up, you’ll be able to start building games and writing code for any of the following consoles:
- Game Boy Advance (GBA)
- Nintendo DS
- 3DS
- Gamecube (GC)
- Wii
- Wii U
- Nintendo Switch
(See below for older Nintendo Consoles)By the end of this tutorial, you’ll be able to build a ROM file that you can test right away on an emulator.Although not covered in this tutorial, you can build homebrew for older Nintendo consoles as well:- Nintendo 64: https://n64.dev/
- NES and SNES: https://nesdoug.com/
- Gameboy/Gameboy Color: here and here
Through the wonderful world of homebrew, you can develop your own games, applications and run custom code on your favorite consoles or emulators. The Nintendo homebrew scene blew up in the early 2000s with the Game Boy Advance (GBA) and Nintendo DS as people found ways to execute custom software on these devices using independently built and open-source development tools. This meant you didn’t have to be part of an established game studio to make games, anyone who knew how to code, or wanted to learn how to code could do it themselves.Today, these tools have continued to mature and expand to modern consoles like the Nintendo Switch. Nintendo has made it slightly easier to get your hands on their official development kit but if you go that route you’ll still have to go through an application process, convince them that you’ve got something good, and sign an NDA which will prohibit you from openly discussing their development tools. This is well within their right, and a necessary process if you are planning on selling your creation as an officially licensed Nintendo product. But what if you just want to start building games or software without a particular title in mind, or you want to build for older systems that are no longer in production?Fortunately you can with freely available homebrew tools. Homebrew can be a great way to learn game development and familiarize yourself with console hardware. In this tutorial, we’ll be setting up a homebrew development environment on macOS. Windows users can do the same here, and Linux users can here. Once you’re set up, you’ll be able to start building games and writing code for any of the following consoles:
- Game Boy Advance (GBA)
- Nintendo DS
- 3DS
- Gamecube (GC)
- Wii
- Wii U
- Nintendo Switch
(See below for older Nintendo Consoles) - Nintendo 64: https://n64.dev/
- NES and SNES: https://nesdoug.com/
- Gameboy/Gameboy Color: here and here
Installing Homebrew Toolchains with DevkitPro
We’ll be using devkitPro, a tried and true producer of homebrew toolchains for Nintendo consoles. See their official Getting Started guide for full details. I’ve outlined the macOS specific steps below. Let’s get started:On macOS:
-
Download the devkitPro pacman installer: Latest ReleaseThe file you want is is “devkitpro-pacman-installer.pkg” under “Assets” at the bottom. You’ll need to have the Xcode command line tools installed. If they are not installed run ‘xcode-select –install’ in Terminal.
-
Open devkitpro-pacman-installer.pkg and run through the installation.If you get an Apple permissions error about not being able to verify the application, go to Apple Logo > System Preferences > Security & Privacy > General. In the lower half you’ll see a message like “devkitpro-pacman-installer.pkg was blocked because it is not from an identified developer.” Click the lock in the lower left, and then click “Open Anyway”. Applications need to be offiicially registered with Apple (for a fee) and signed to avoid this message, but a lot of independent and free software isn’t, so you’ll get this warning.
-
Once the devkitPro pacman installer is installed, reboot your Mac Now you can easily install the build tools for your Nintendo consoles of choice.We’ll be using devkitPro, a tried and true producer of homebrew toolchains for Nintendo consoles. See their official Getting Started guide for full details. I’ve outlined the macOS specific steps below. Let’s get started:On macOS:
-
Download the devkitPro pacman installer: Latest ReleaseThe file you want is is “devkitpro-pacman-installer.pkg” under “Assets” at the bottom. You’ll need to have the Xcode command line tools installed. If they are not installed run ‘xcode-select –install’ in Terminal.
-
Open devkitpro-pacman-installer.pkg and run through the installation.If you get an Apple permissions error about not being able to verify the application, go to Apple Logo > System Preferences > Security & Privacy > General. In the lower half you’ll see a message like “devkitpro-pacman-installer.pkg was blocked because it is not from an identified developer.” Click the lock in the lower left, and then click “Open Anyway”. Applications need to be offiicially registered with Apple (for a fee) and signed to avoid this message, but a lot of independent and free software isn’t, so you’ll get this warning.
-
Once the devkitPro pacman installer is installed, reboot your Mac
Installing Console Specific Tools
With the devkitPro pacman installer installed, you can now install tools for the specific Nintendo console you want to build games or programs for. We’ll install the GBA tools as an example. The process is the same for other consoles.
-
Enter the following command in Terminal:$ sudo dkp-pacman -S gba-devYou can simply replace ‘gba-dev’ with any other supported console to install that console’s tools. For all other consoles including the Nintendo Switch and 3DS see: Predefined Groups With the GBA tools installed, we’ll now build a simple ‘Hello World’ example to produce a .gba ROM. To test it we’ll need an emulator.With the devkitPro pacman installer installed, you can now install tools for the specific Nintendo console you want to build games or programs for. We’ll install the GBA tools as an example. The process is the same for other consoles.
-
Enter the following command in Terminal:$ sudo dkp-pacman -S gba-devYou can simply replace ‘gba-dev’ with any other supported console to install that console’s tools. For all other consoles including the Nintendo Switch and 3DS see: Predefined Groups
Building a ROM and Testing it on an Emulator
Free and open-source emulators exist for all Nintendo consoles. In our example, we are building a .gba ROM, so we’ll need a GBA emulator. For this, we’ll be using Visual Boy Advance (VBA) which is one of the best and most popular GBA emulators that’s been around for decades.
-
Download and Install an emulator for your target console. In our case you can download VBA here and follow these installation instructions for Mac .
-
Create a new directory for your homebrew project:$ mkdir hello-gbaWith your installation of ‘gba-dev’ or for any other console, you will get a number of examples of source code you can compile and play around with. For me, the GBA examples were installed to “/opt/devkitpro/examples/gba/“ when I installed the GBA tools. You can also view the GBA examples online here. We’ll be copying the GBA ’template’ example, which is really just a ‘Hello World’ program.
-
Write the code for you project. Or in our case, just copy the contents of “/opt/devkitpro/examples/gba/template” to the “hello-gba” directory you created in the previous step. If you are having trouble finding the ’template’ example on your computer, you can get it online from here. Make sure to copy all of the contents of ’template’. You should have a ‘Makefile’, ’template.pnproj’ file, and a ‘source/’ folder with ’template.c’ inside.
-
Now cd into your project directory and build the project:$ cd hello-gba$ makeAfter running ‘make’ you should see output like this:
 Your project directory should now have a ‘build/’ directory, an .elf file and a .gba ROM—in our case named “hello-gba.gba”. Now let’s test that it works.
 -
Test your ROM in an emulator. Open “hello-gba.gba” with Visual Boy Advance:
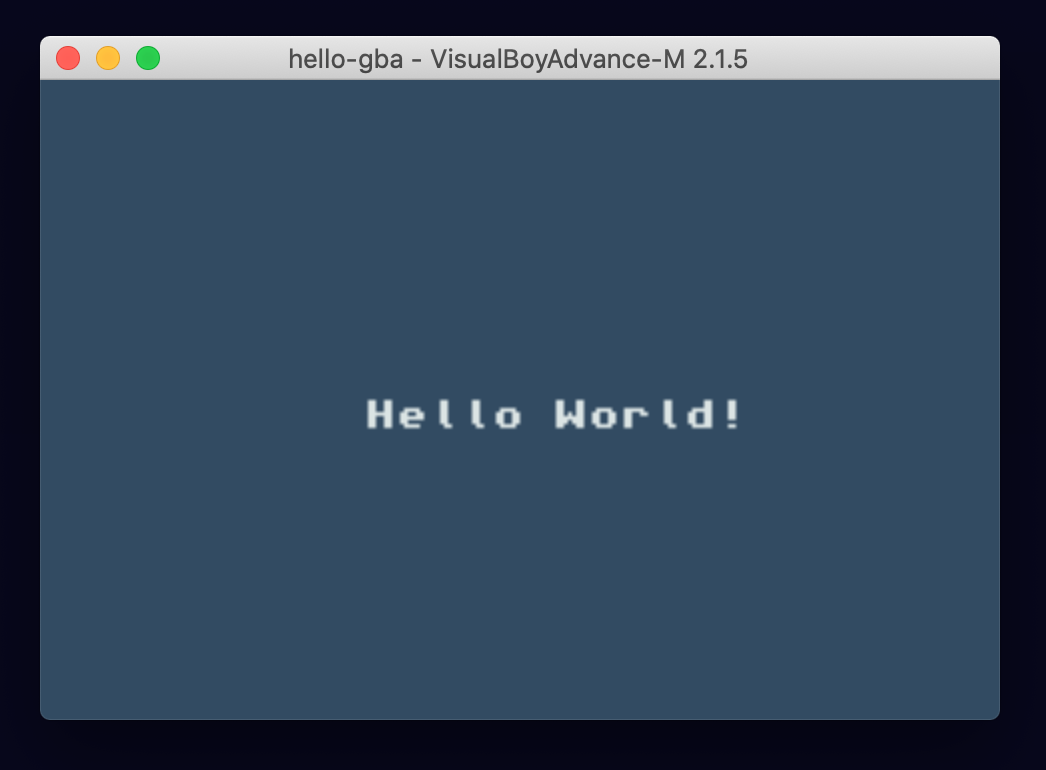 Congrats! You’ve built a GBA ROM. If you want, you could run this on actual hardware with a GBA flashcart. You can pick up the EZ Flash Omega or EverDrive GBA series from Amazon, or shop around Ebay or AliExpress for less expensive options.From here you might want to try modifying the ‘Hello World’ example, building more GBA examples, and compiling programs for other consoles.
Free and open-source emulators exist for all Nintendo consoles. In our example, we are building a .gba ROM, so we’ll need a GBA emulator. For this, we’ll be using Visual Boy Advance (VBA) which is one of the best and most popular GBA emulators that’s been around for decades.
Congrats! You’ve built a GBA ROM. If you want, you could run this on actual hardware with a GBA flashcart. You can pick up the EZ Flash Omega or EverDrive GBA series from Amazon, or shop around Ebay or AliExpress for less expensive options.From here you might want to try modifying the ‘Hello World’ example, building more GBA examples, and compiling programs for other consoles.
Free and open-source emulators exist for all Nintendo consoles. In our example, we are building a .gba ROM, so we’ll need a GBA emulator. For this, we’ll be using Visual Boy Advance (VBA) which is one of the best and most popular GBA emulators that’s been around for decades. -
Download and Install an emulator for your target console. In our case you can download VBA here and follow these installation instructions for Mac .
-
Create a new directory for your homebrew project:$ mkdir hello-gbaWith your installation of ‘gba-dev’ or for any other console, you will get a number of examples of source code you can compile and play around with. For me, the GBA examples were installed to “/opt/devkitpro/examples/gba/“ when I installed the GBA tools. You can also view the GBA examples online here. We’ll be copying the GBA ’template’ example, which is really just a ‘Hello World’ program.
-
Write the code for you project. Or in our case, just copy the contents of “/opt/devkitpro/examples/gba/template” to the “hello-gba” directory you created in the previous step. If you are having trouble finding the ’template’ example on your computer, you can get it online from here. Make sure to copy all of the contents of ’template’. You should have a ‘Makefile’, ’template.pnproj’ file, and a ‘source/’ folder with ’template.c’ inside.
-
Now cd into your project directory and build the project:$ cd hello-gba$ makeAfter running ‘make’ you should see output like this:
Your project directory should now have a ‘build/’ directory, an .elf file and a .gba ROM—in our case named “hello-gba.gba”. Now let’s test that it works. -
Test your ROM in an emulator. Open “hello-gba.gba” with Visual Boy Advance:
Congrats! You’ve built a GBA ROM. If you want, you could run this on actual hardware with a GBA flashcart. You can pick up the EZ Flash Omega or EverDrive GBA series from Amazon, or shop around Ebay or AliExpress for less expensive options.From here you might want to try modifying the ‘Hello World’ example, building more GBA examples, and compiling programs for other consoles.
Building for Other Consoles
The process is very similar for other consoles:
-
Install the tools for your target console with sudo dkp-pacman -S <PREDEFINED-GROUP> (See Groups)
-
Get an emulator for the console
-
Create a new project or build an example project to create a ROM
-
Test the ROM on the emulator. The devkitPro examples are a fantastic resource for getting started with basic functionality. Console specific examples are added when you install tools for each new console, and are also provided by the devkitPro team on their GitHub: See Examples. You can test whatever you build on an emulator, and if everything looks good, you can then test on actual hardware.That does it for this tutorial. See our Tutorials Section for more tutorials like this one.The process is very similar for other consoles:
-
Install the tools for your target console with sudo dkp-pacman -S <PREDEFINED-GROUP> (See Groups)
-
Get an emulator for the console
-
Create a new project or build an example project to create a ROM
-
Test the ROM on the emulator. See Examples Tutorials Section
Related:
› Building Your First Homebrew Game: Pong for the GBA› Setting up a Homebrew Development Environment on Windows› Setting up a Homebrew Development Environment on Linux› Building Your First Homebrew Game: Pong for the GBA› Setting up a Homebrew Development Environment on Windows› Setting up a Homebrew Development Environment on Linux youtube.com/@ZeroDayArcade
 github.com/ZeroDayArcade
FAQ
What is the origin of the name Roulette?
What is the origin of the name Roulette? The origin of the name “roulette” is French and it means “little wheel”. The name is derived from the fact that the game is played on a small wheel that spins around, with players betting on where the ball will land. The word “roulette” was first used in its current context in the 18th century, although the game itself dates back much earlier.
What were the original rules and betting options for roulette?
What were the original rules and betting options for roulette? The original rules and betting options for roulette were relatively simple. The game featured a spinning wheel with numbered pockets, typically ranging from 1 to 36. The early versions of the game also featured a single zero pocket, which gave the house a slight edge. In some variations, there was also a double zero pocket, which further increased the house edge.
Game Vault Crashing? Fix It Fast!
Game Vault, a self-hosted game management tool, often stops working due to common setup glitches that users can fix quickly. Issues like connection failures or missing games typically stem from permissions, configs, or network hiccups. Here’s a straightforward guide to get it running smoothly again. Check Server Status Verify the GameVault server is active and reachable from your client device. Restart both the client and server apps, then review logs by setting SERVER_LOG_LEVEL to debug for detailed error clues.
Can Game Vault 777 Run Offline? Yes! Spin Anywhere
Hey there, fellow gamer! Game Vault 777 lets you play many games offline after downloading them first. For example, slots like Lucky 7s or classic card games work great without Wi-Fi, perfect for flights or commutes. Offline Goodies Dive into single-player fun with titles such as Fruit Frenzy or Diamond Dash—they load up smoothly offline. Just download via Wi-Fi ahead of time, and you’re set for hours of no-connection spins and wins.
Is 777 slot game real?
Additionally, 777 Casino online is part of 888 Holdings plc which is not only one of the largest iGaming brands in the world, but a company that’s registered on the London Stock Exchange.This system of dual accountability (to gaming authorities and public shareholders) is rare in the online casino world and one of the …
Enjoy fun casino-style slots with exciting themes and engaging gameplay!
This site only collects related articles. Viewing the original, please copy and open the following link:How to Build a ROM for Nintendo Consoles on macOS